What if traffic lights displayed the word “Go” or “Stop” instead of a green or red light? Unless the letters were 20 feet tall, it would be difficult to tell from any distance whether you should keep going. Indicators or icons improve usability, providing quick recognition of state and can also serve to draw the eye to clickable targets on a web page. Choice fields in SharePoint Online are excellent candidates for indicators, but how does one override the text with an icon without editing the page code and breaking the SharePoint magic of automatically responding to subsequent view configuration changes? There is a way and it’s called a JS Link Override or Client-side Rendering (CSR). By following this example, you will be well on your way to opening up a world of customization capabilities.
In this example, we will override the Status field on a view of Tasks, changing this:
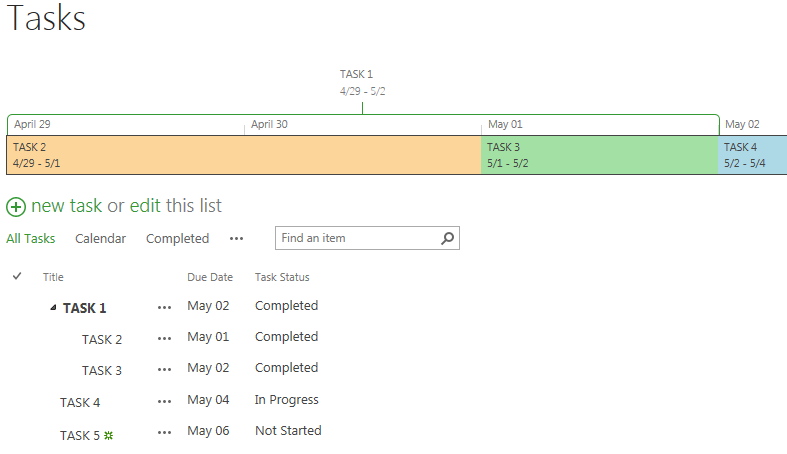
To this:
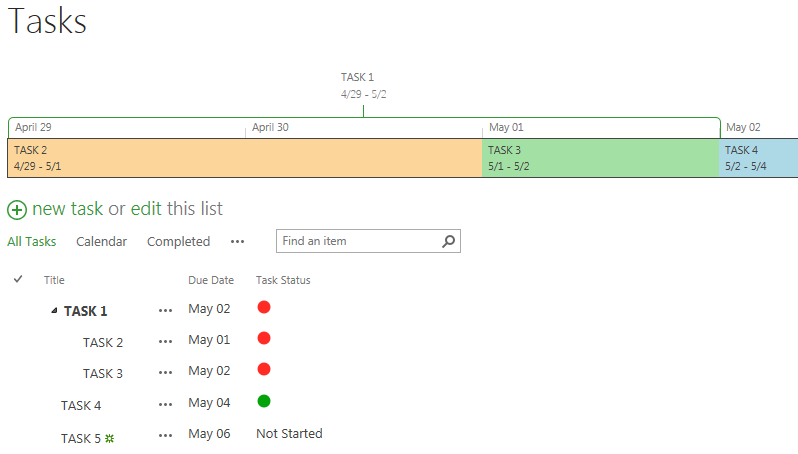
We will use SharePoint Designer 2013 to upload the icons and edit a JavaScript file. Then we will edit a list view web part and set the JS Link to our JavaScript file. (This is a field override, but CSR can also target the list view itself or even a search results page.)
Step 1 – Upload Icons to SharePoint
-
Fire up SharePoint Designer 2013 and open a site with a SharePoint Task list
-
Go to All Files, _catalogs, masterpage and create a folder with your company name (this is where all the cool kids are putting their customization files)
-
In the company folder, create an “icons” folder
-
In the icons folder, click the ribbon button “Import Files” and browse to your icons (I used png files, but any type of image file that works in an HTML image tag is fine)
Step 2 – Code the Override in JavaScript
-
At the same level as the icons folder, create a “js” folder
-
In the js folder, click the ribbon button “File” and choose JavaScript, then rename the file to TaskStatusIndicator.js and open it in advanced mode
Add the following code to setup our override:
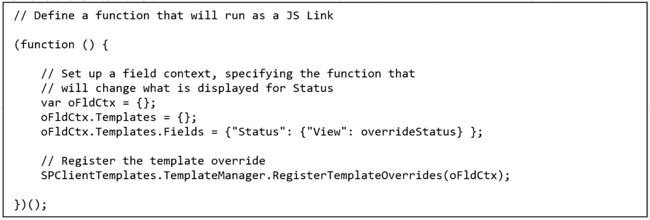
-
Next, add the following code to specify the function that will return the value (an icon) that we want to display in the Status column for each item in the list view of Tasks:
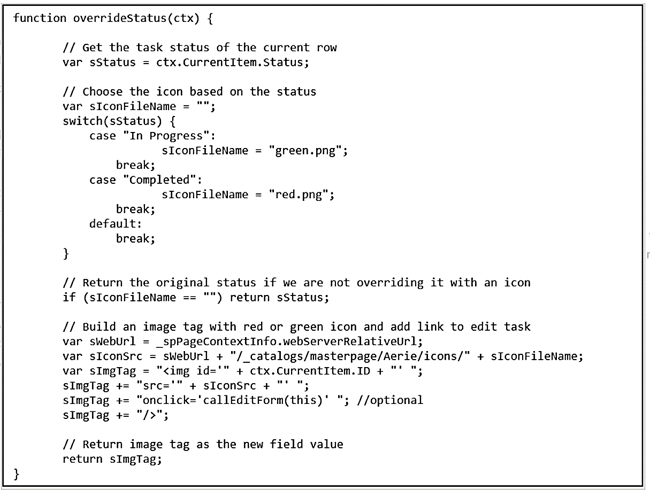
-
I added an “onclick” event handler to the image tag that will navigate to the standard edit form for a Task item. You can remove that line above, or add the following code to support it:
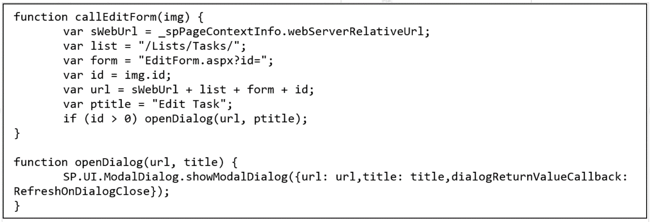
-
Save
Step 3 – Link the JavaScript to the Web Part
-
In the browser now, go to a SharePoint page that displays a list view of Tasks
-
Under the SharePoint gear, choose Edit page
-
Click the dropdown arrow in the upper-right corner of the list view web part and choose Edit Web Part
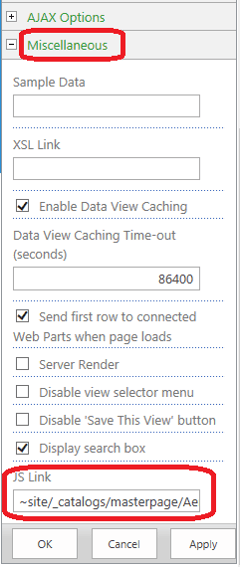
Scroll to the right until you can see the entire web part edit panel and open the Miscellaneous section
-
In the Miscellaneous section, set the JS Link field to point to your JavaScript file
-
I used the following path:
-
~site/_catalogs/masterpage/Aerie/js/TaskStatusIndicator.js
-
Click OK
-
Click Stop Editing in the Page ribbon
When the page refreshes, you should see a green dot in the Status column for Task items that are “In Progress” and a red dot for “Completed” items. All other Status values should display the original text from the choice field. To remove the override functionality, simply clear the JS Link field. If you included the event handler, you will be able to just click on a green or red dot to bring up the Task item edit form in a dialog box. The users will love this shortcut and using this example, you can set it up to go wherever they want to go – the world is theirs! You have a green light to reuse any of the code samples in this blog.
Share